

We have GI at home
It has been a while since I’ve posted something here! For the past few months, I have mostly been working on Global Illumination (GI) for my engine Carrot, switching with other tasks when I grew bored. I might do a few articles on them, even if I don’t think they generalise as such as my other articles.
Oh and I shipped a small indie game, so I was a tiny bit busy.
The (past) state of Carrot’s lighting
My lighting implementation used to be fully raytraced. While this has the advantage of realism and a unified technique for all lighting, the result is extremely noisy. I have made several attempts at denoising the result with moderate success. This meant the final result was:
- noisy
- ugly
- taxing on performance due to multiple-bounce raytracing and the multiple passes of denoising
Therefore, I was extremely dissatisfied with the lighting in my engine and needed to improve on it.
How I had the idea to change
The @GPUOpen Mastodon account tooted about AMD Capsaicin Framework a while back, and linked to the GI-1.0 paper. I read about the idea of using a hashmap on the GPU to store the results of light bounces, thought “that’s neat” and promptly forgot about it.
A few months ago, after finishing my last article on Virtual Geometry & Raytracing, I decided to improve the lighting quality of my engine. That’s when I remembered the GI-1.0 article and decided to attempt to implement some of its ideas.
Changes required
The first step was to scrap my old lighting pipeline and reimplement direct lighting, reflections and ambient occlusion. I had kept my code to create BLASes and TLASes for raytracing, so this was straight forward: trace some rays and compute the result.
On the importance of debug tooling
There is one detail I want to focus on. I am obviously not perfect so I had made multiple mistakes while implementing my ambient occlusion pass.
When doing graphics programming - and any other kind of programming really - you should have ways to debug what you are doing. Graphics programming does not really have breakpoints* so it is important to be able to see the different steps used for creating your frame.
Frame debuggers are one solution that need almost no work on your end, and are very powerful to understand how your frame is constructed.
* Yes I know that technically you can do it via emulation on frame debuggers like Renderdoc, NSight or PIX.
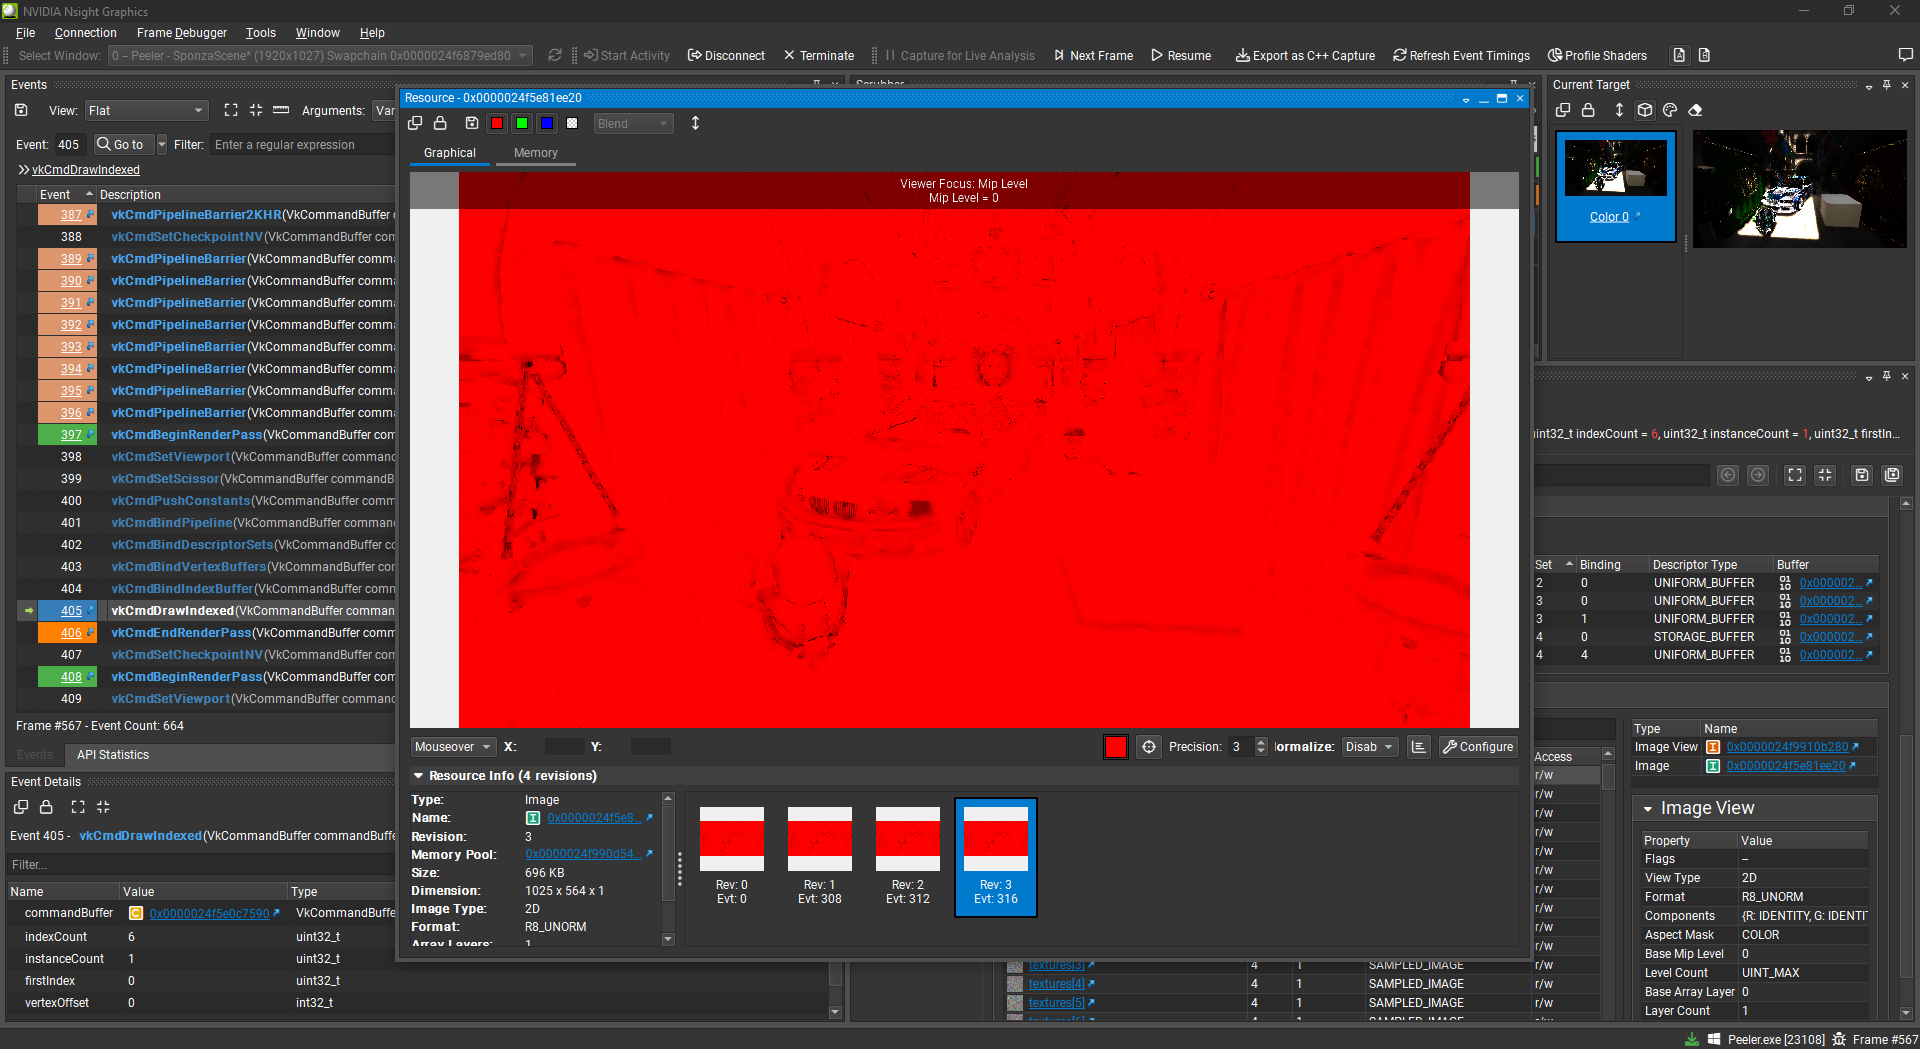
Ambient occlusion pass output, seen through NSight Graphics
However, sometimes you may want to see the evolution of one texture across time, or when moving the capture. You could make multiple captures, and switch between them, but it gets annoying fast. My advice is to implement a runtime/live debugger inside your engine to be able to see how a buffer/texture is modified across your different render passes. Not only can you see the modifications during movement, you can also create your own visualizers, and see how your resource is passed along your different render passes.
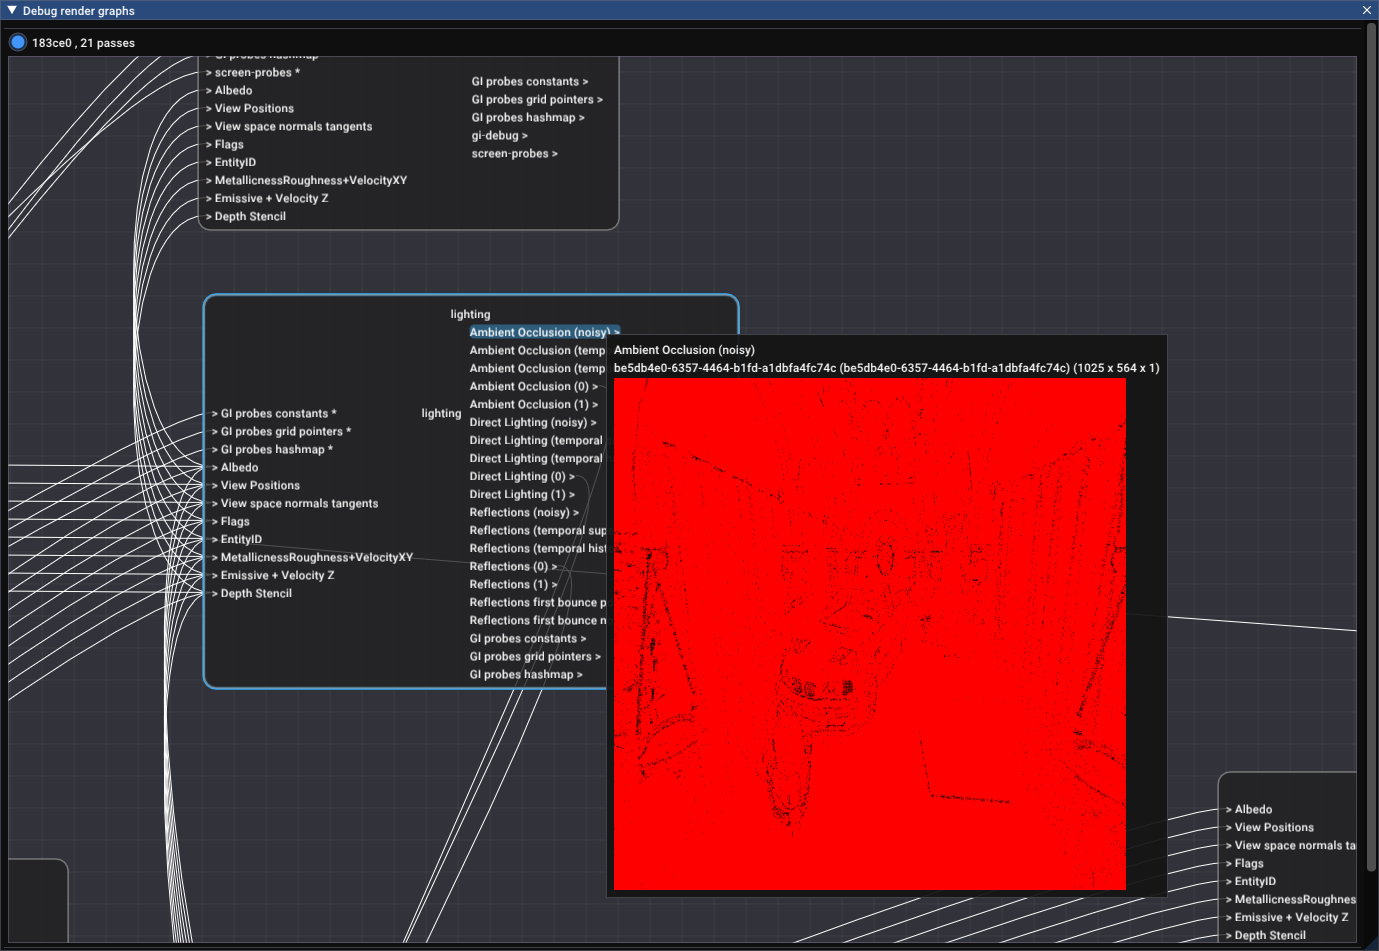
Ambient occlusion pass output, seen through my engine’s render graph debugger
This tool was absolutely instrumental to making the GI technique work, as I added a buffer visualizer, which helped me ensure my hashmap got filled correctly, but I’m starting to spoil the rest of the article…
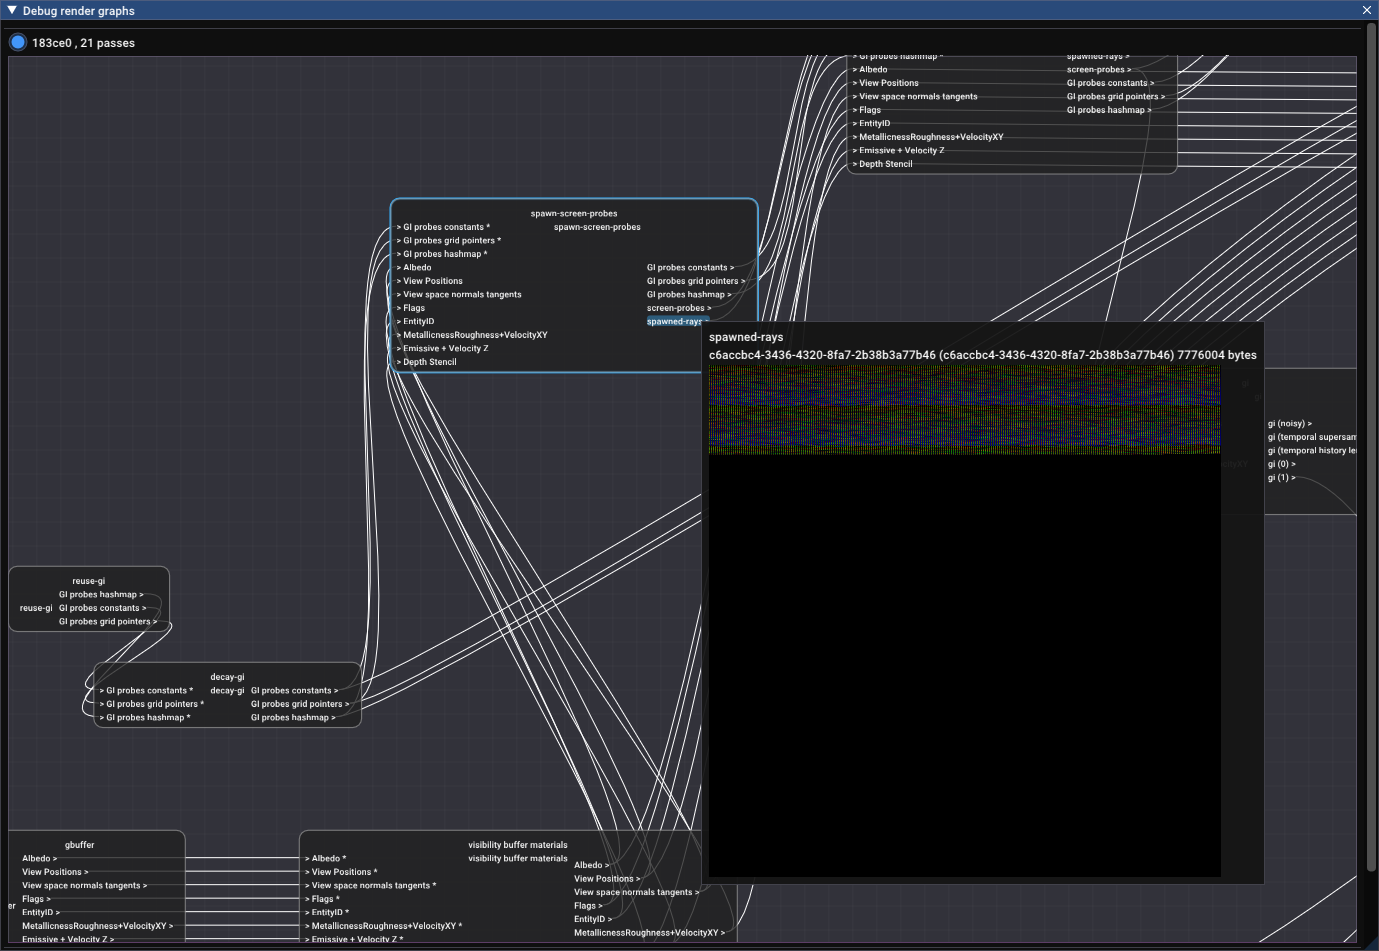
Buffer visualization inside my engine’s render graph debugger
My interpretation of the GI technique
This is now the part where I talk about what I understood of the technique, and what I implemented. This is my own retelling, and I highly advise you to read the original paper if you want more details. Seriously, it is really great!
The goal is to attempt to compute the GI for a dynamic scene, with as few rays as possible, and without prior knowledge of the scene. This is achieved with the “two-level radiance caching scheme” described by the article. There are two main components: the screen-space cache and the world-space cache.
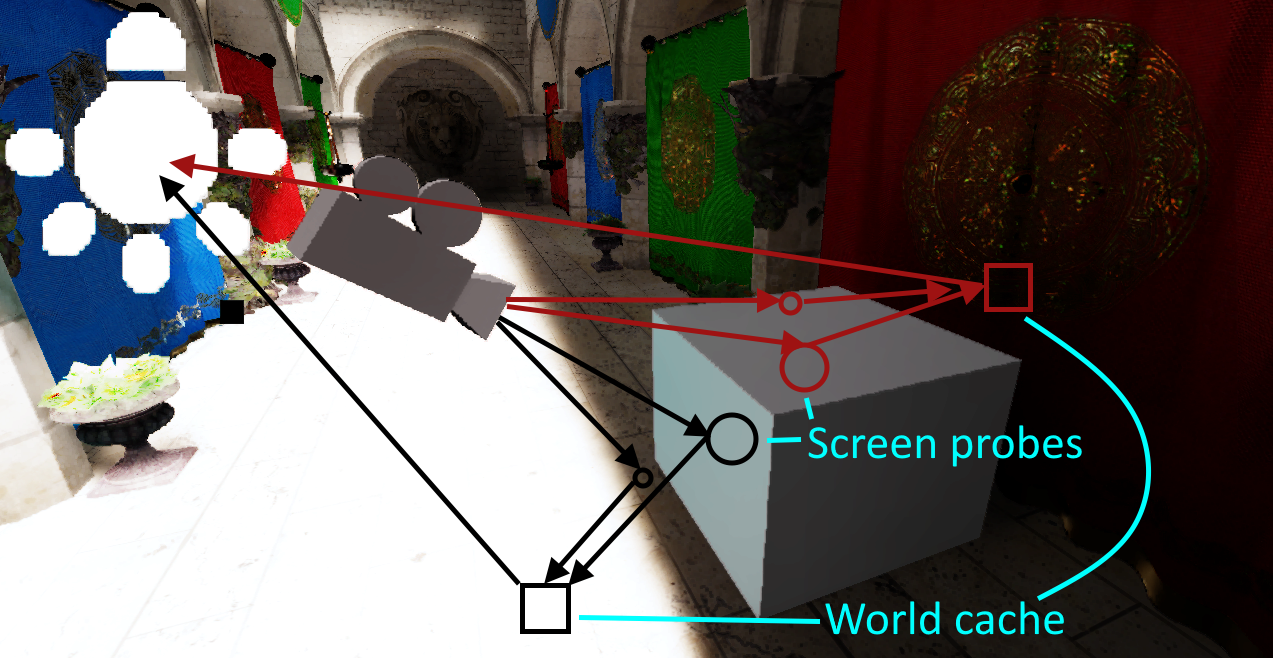
Visualisation of GI rays. First ray is computed via GBuffer rasterization, and second is “real” raytracing. Heavily inspired by Figure 2 of GI-1.0 paper. (Light does not come from lightbulb shown in screen, this is just for visualisation)
Screen-space cache
The screen is split in tiles (8x8 pixels in the article and my implementation), and each tile corresponds to a probe. The technique assumes you already have a rasterized GBuffer and uses it for the first ray bounce. Having the GBuffer also allows for reprojection: by using motion vectors, and comparing the normal and position of each pixel with the previous frame, one can reuse the GI computed in the previous frame when possible.
This enables to reuse rays from previous frame to spread raytracing costs over multiple frames.
World-space cache
The world-space cache is the reason why I started looking into implementing my own version of GI-1.0. Its main force resides in its ability to adapt to any scene, without having to prebake anything. The ‘key’ of this cache is a quantized position and orientation of a point in space, relative to the camera. The computed radiance is stored inside a GPU-local hashmap to be able to insert and query for the presence of data quickly and atomically.
When tracing rays for computing the GI of the scene, multiple rays can touch two points with very close positions and ray directions. However, the radiance will be almost the same between the two rays. Therefore, you can reuse the results of rays that touch roughly the same location. If you add temporal reuse into the mix, you will accumulate many samples of radiance for a given location, improving its accuracy.
Tying it together
Each frame, screen probes are spawned all over the screen* and each probe attempts to reproject itself via motion vectors. If reprojection works, the screen probe reuses the radiance from the previous frame. If it fails, you have no radiance to reproject but there is something you can do, which I will explain last in this section. One interesting point to note is that the probes are spawned in screen space, but correspond to 3D points inside the scene, using the information in the GBuffer.
* The paper actually suggests to spawn one probe out of every 4 each frame, and to change the offset in this sequence each frame. The goal is to further reduce the number of rays per frame. With temporal reuse this becomes invisible and after 4 frames you have spawned all probes.
Once all probes are spawned, you can shoot N rays per probe to go intersect in the scene. Each ray will intersect with another geometry or the sky, which gives you the radiance for this specific ray. If it intersects some geometry, you can query the already present GI via the world-space cache, and accumulate the radiance you just computed back into the world-space cache. Then you can accumulate the already-cached GI and the newly computed GI back into the screen probe, ready for consumption for compositing the final image.
For probes that failed reprojection, the technique “steals” the rays used by a random reprojected probe to increase the amount of rays for the non-reprojected probe, without increasing the total ray count per frame. This has the effect of increasing the raytracing budget for disoccluded areas, which are the areas which lack the most information. However on my end, because my pathtracer is a bit naïve (no importance sampling, and no reservoir-based sampling) this is only a tiny quality improvement.
Here’s my code for this:
layout(set = 1, binding = 0, scalar) buffer ScreenProbes {
    ScreenProbe[] probes;
};

layout(set = 1, binding = 2, scalar) buffer SpawnedProbes {
    uint spawnedProbeCount;
    uint[] spawnedProbes; // filled when spawning probes for the entire screen
};

// Buffer of probes which failed reprojection
layout(set = 1, binding = 3, scalar) buffer EmptyProbes {
    uint count;
    uint[] indices; // index into 'spawnedProbes'
} emptyProbes;

// Buffer of probes which succeeded reprojection
layout(set = 1, binding = 4, scalar) buffer ReprojectedProbes {
    uint count;
    uint[] indices; // index into 'spawnedProbes'
} reprojectedProbes;

// ...

// KERNEL
void reorderSpawnedRays() {
    // bound checks
    if(reprojectedProbes.count == 0) {
        return;
    }

    const uint emptyProbeIndex = gl_GlobalInvocationID.x;
    if(emptyProbeIndex >= emptyProbes.count) {
        return;
    }

    uint probeIndex = emptyProbes.indices[emptyProbeIndex];
    // pick a reprojected probe to steal from
    uint indexToSteal = emptyProbeIndex % reprojectedProbes.count;

    // change which probe index the reprojected probe points to, and make it point to our empty probe
    atomicExchange(spawnedProbes[reprojectedProbes.indices[indexToSteal]], probeIndex);
}
You may notice that I have no random selection of a reprojected probe to steal. I had issues with multiple non-reprojected probes stealing the same probe, which lead to some “vampirisation” where some non-reprojected probes would steal the already-stolen probe of another non-reprojected probe, which meant there would be no additional rays for that probe. I changed this to simply take the reprojected probes in sequence, which tend to steal from the probes at the top of the screen, but at least it redistributes rays evenly among non-reprojected probes.
Resulting implementation
To summarize my 6 months-worth of evening work in a few sentences:
The very first version of my implementation only implemented the world-space cache, and traced multi-bounce rays in the scene. This was technically enough to have GI that somewhat worked, but it was extremely noisy and responded very poorly to camera movement. There were some techniques that improved its quality, mainly jittering the inputs of the world-space cache. This means the position used to query and insert into the cache would be slightly offset by a random amount (of the order of the quantization amount), in order to mix the radiance of neighbouring cells of the cache. The jittering coupled with a denoiser would eliminate the noise coming from the borders forming between cells, as they had differences in their radiance.
However, two weeks before writing this article, I understood that continuing without the screen-space cache would not work for me. Therefore, I started implementing the screen-space cache too, which went surprisingly fast and well.
All this resulted in the following render passes:
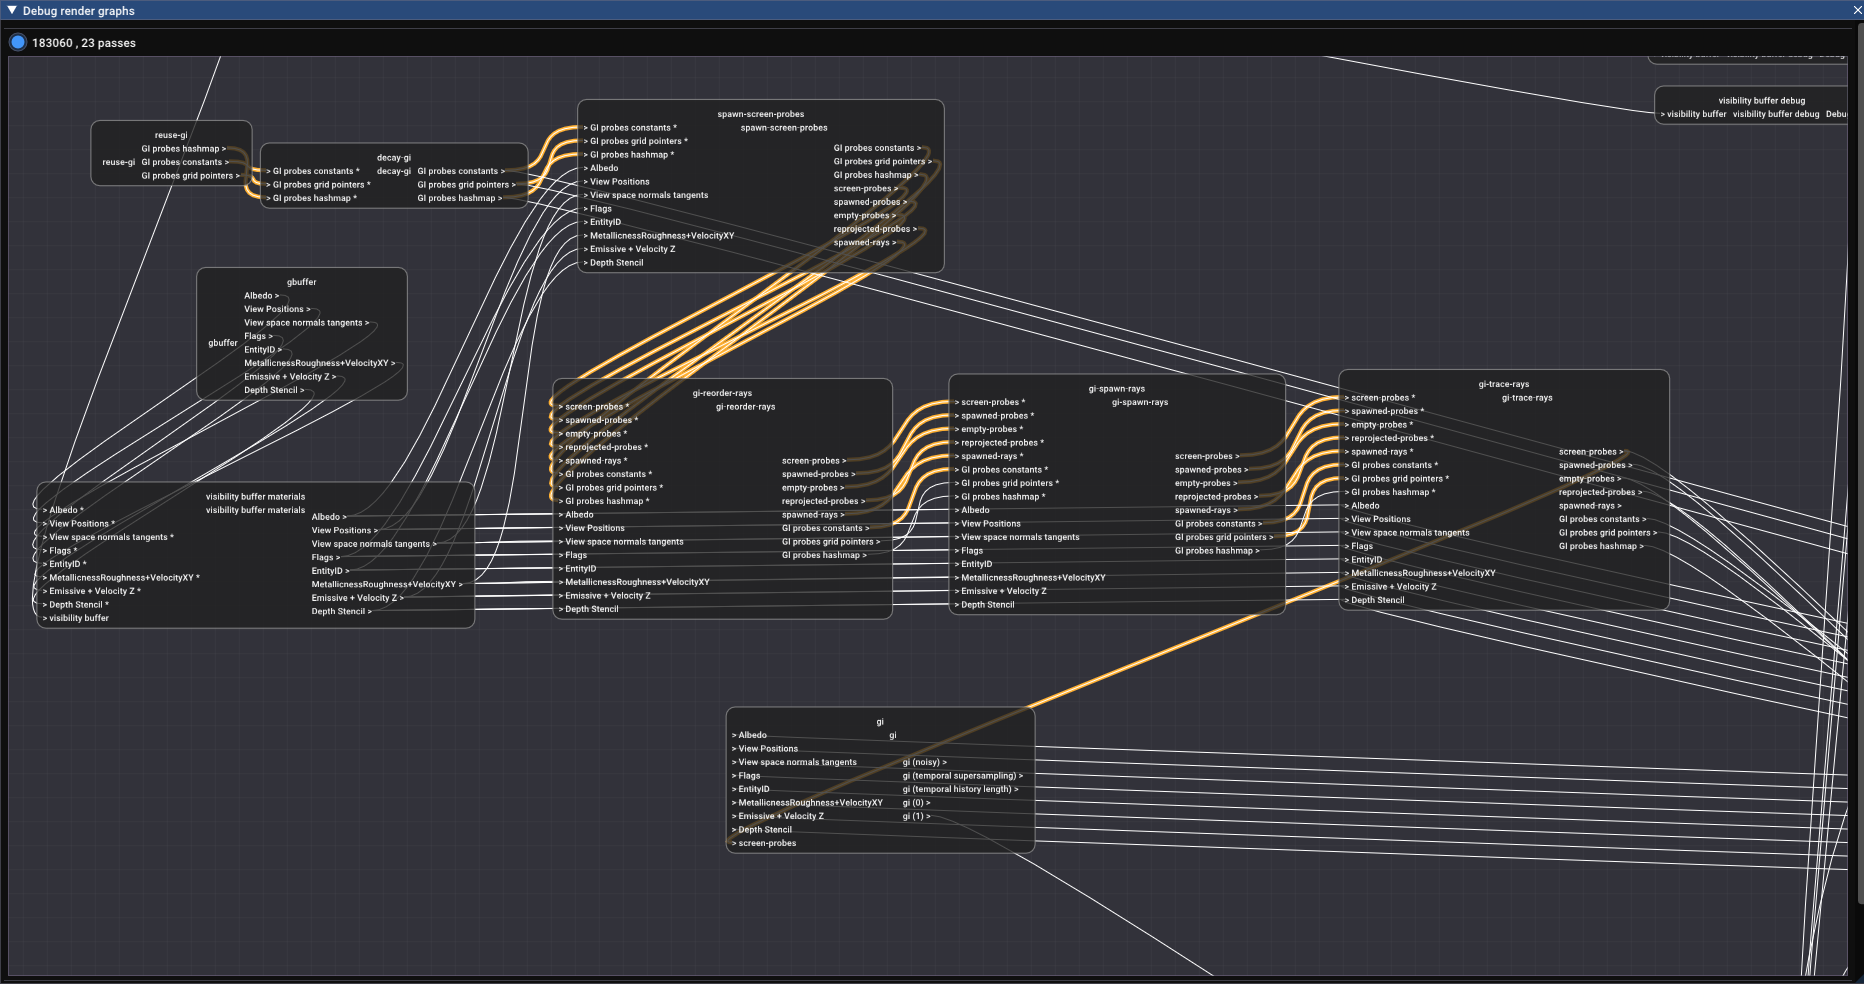
Render passes taking part in building the GI
gbuffer: Regular GBuffer pass, outputs to multiple render targets for information on materials.visibility buffer materials: Writes to GBuffer with results from the Recreating Nanite series.reuse-gi: Reuses the GI world-space cache from the previous frame. Basically just a call tovkCmdCopyBuffer.decay-gi: Removes all GI world space cells which are too old (not touched for more than 60 frames).spawn-screen-probes: Reprojects and prepare rays for the GI screen probes.gi-reorder-rays: Attempts to fill disoccluded areas by deallocating rays from reprojected probes.gi-spawn-rays: Generates the list of probes to trace rays for.gi-trace-rays: Shoot rays in the scene based on rays generated bygi-spawn-rays, updates the screen probe contents.gi: For each pixel on screen, interpolate between the closest screen probes and average their radiance values, outputting this togi (noisy). Then some temporal and spatial denoising is applied for consumption for the finalmerge-lightingpass (not visible on screen).- A few debug passes are not shown in the screenshot, but their inputs are taken from the passes shown here. This is visible through the links going to the right of the screenshot.
I have tried to highlight the most important links (between GI passes).
Conclusion
Carrot finally has some GI that works and is not too noisy!
Here it is under movement:
What went wrong
Going head-first into a realistic lighting model, without first reading on radiosity terms makes for a painful understanding of the quantities the original paper talks about. This is probably noticeable in my implementation and this very article.
As I said before, it took me 6 months to go from restarting from scratch to this point. Thanksfully, I did not spend 6 months working on GI each evening. There were a few moments where I started to wonder if I would ever manage to implement my GI properly, with results that I could be proud of. I looked at pre-made solutions for GI, notably RTXGI and Brixelizer GI, and wondered if I should give up on my implementation and integrate one of these solutions.
I almost burned out working on the lighting part of my engine because of this.
What helped me (aside from spending time with friends and playing games and doing anything else than work on my engine) was to do smaller tasks that had no link to rendering:
- finishing the prefab support of my engine
- trying to port my engine to the Steam Deck
- participating in a game jam with colleagues
What went right
- Implementing the hashmap backing the world-space cache went surprinsingly fast and without too many issues, even though I could not test anything until the entire implementation was finished. It also taught me a lot about how hashmaps work!
- I had a bug in my probe reprojection step at some point, and this created some accidental glitch art which I found interesting.
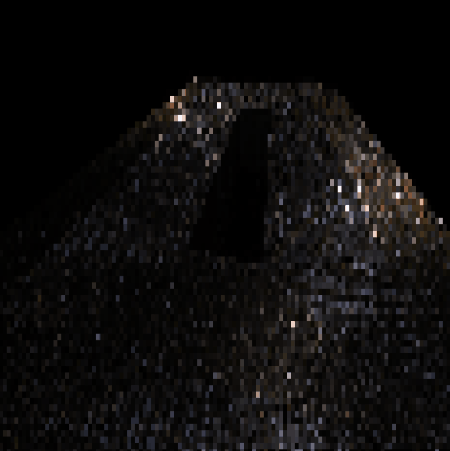
View of reprojected probes with a bug, making colors bleed into each other during movement.
- I am finally at a point where I am satisfied with the lighting in my engine. It is by no means perfect, but at least it is good enough.
What could be improved
In the “under movement” video you can see that disoccluded areas have some noise for a few frames. My issue is that the result of a single frame of computation is not enough to provide a satisfactory result. This is because most of my rays end up not contributing anything to the GI samples, due to my naïve pathtracer. A more intelligent pathtracer, with better sampling, should probably overcome this problem. The change is for future me :)
That’s it for this article, I hope you liked it!